• About
  • Contact
  • FTC Disclosure

Busy in the Burbs

Busy in the Burbs

Tag Archives: Chicken

Chicken and Walnuts

02 Friday Jun 2017

Posted by Nora in Recipes

≈ Comments Off on Chicken and Walnuts

Tags

Chicken, tofu

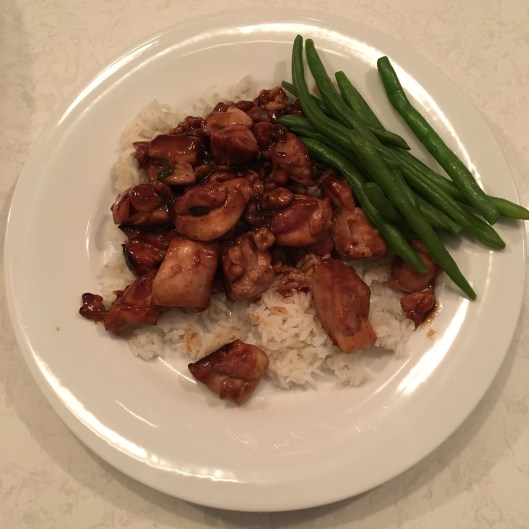
This is a very Americanized version of an Asian inspired dish.  It works equally well with tofu to produce a vegetarian version.  It is also easy to double or triple depending on your needs.  Serve over rice or noodles with a vegetable on the side.

IMG_6415

Ingredients:
1-2 lbs boneless chicken thighs, cut up
*** works equally well with tofu or boneless chicken breasts, depending on your tastes
¼ cup brown sugar
1/3 cup soy sauce
¼ cup apple juice
2 T red wine vinegar
2 T vegetable oil
½ tsp ground ginger
½ tsp pepper
¼ cup sliced scallions
½ cup walnuts

Directions:

  1. Combine brown sugar through pepper to create the marinade.
  2. Marinate chicken at least half an hour.
  3. Drain chicken, saving the marinade.
  4. Stir fry the chicken with the scallions.
  5. When the chicken is cooked through, add the marinade to the pan and reduce.
  6. Add the walnuts just before serving.

Lemon Chicken

06 Friday Jan 2017

Posted by Nora in Recipes

≈ 1 Comment

Tags

Chicken

I got ahead of myself and posted a recipe yesterday.  Here we go with the Friday posts.

This is a simplified version of Martha Stewart’s Roast Spatchcocked Lemon Chicken.  I include the link because it is the more “complete” recipe.  It also includes instructions on how to spatchcock a chicken.

All that being said, our family prefers chicken thighs so I make this with just thighs, and usually leave out the shallots because I don’t always have them around.

img_5771

Lemon Chicken
inspired by Martha Stewart

Ingredients:
Bone-in, skin-on chicken thighs (enough for your family, though leftovers make great white chili or chicken salad)
Lemons, sliced (enough for one slice per thigh)
Salt & pepper

Directions:

  1. Preheat oven to 425°.
  2. Cover a baking sheet with aluminum foil.
  3. Slide one slide of lemon under the skin of each thigh.  (If you have a child that doesn’t like lemons you can leave theirs alone.)
  4. Salt and pepper the chicken.
  5. Roast for 45-50 minutes or until your thermometer reads 165°.

Asiago Chicken

28 Friday Oct 2016

Posted by Nora in Recipes

≈ Comments Off on Asiago Chicken

Tags

Chicken

As you may have noticed from my menu plans, this is one of our go-to recipes.  The ingredients are easy to keep on hand, everyone will eat it, its quick, and its foolproof.

img_5486

Orzo with Chicken & Asiago

Ingredients:
1 cup water
1 (16-ounce) can chicken broth
12 ounces boneless, skinless chicken thighs cut into bit sized pieces
1¼ cups uncooked orzo
1 cup peas
½ cup grated Asiago cheese, divided
¼ tsp salt
¼ tsp basil
¼ tsp Italian seasoning
¼ tsp pepper

Directions:

  1. Combine water and broth in a dutch oven; bring to a boil.
  2. Add chicken and pasta; bring to a boil.  Reduce heat, simmer 12 minutes, stirring occasionally.
  3. Remove from heat; stir in peas, 1/4 cup cheese, salt, herbs, and pepper.
  4. Top each serving with 1 Tbsp cheese.
Makes 4 servings
Prep: 5 min
Cook: 25 min
Notes:
Fresh peas are best, but frozen work fine.  Since peas are so small, there’s really no need to thaw them first, just throw them in towards the end of the simmer step before the cheese.
Re step 2, cook until sauce is desired thickness.  If you need to slow down dinner it can simmer longer – just add a bit more chicken broth.
I’ve also made this with green beans though I think peas are better.  I imagine broccoli would work well too.
You can adjust the quantity of chicken to your needs.
Makes a great side if you skip the chicken.
To make a vegi version (or if you’re all out), use vegi broth instead of chicken.

Basic Chicken Pot Pie

07 Friday Oct 2016

Posted by Nora in Recipes

≈ Comments Off on Basic Chicken Pot Pie

Tags

Chicken, Chicken Pot Pie

Yes, there are plenty of recipes already on the internet.  And, yes, there are fancier versions.  But, this one is relatively quick and easy, the kids will eat it, and it reheats well.

You can adjust the chicken/potato/carrot ratio.  Parsnips or turnip are also nice additions.  I prefer to make two shallow pies, but you could make one deep one depending on your family’s feelings about crust.

img_5394

Ingredients:
6 lbs boneless, skinless chicken thighs
2 potatoes
6 carrots
chicken broth – up to 3 cups
1/4 c (1 pkg) brown gravy mix
1 can cream of chicken soup
2 Tbsp corn starch
1/4 c water
1-2 pie crusts (recipe below)

Directions:

  1. Cut chicken, potatoes, and carrots into bite size pieces.
  2. Add chicken to a large pot.  Cover with water and boil 20 minutes until cooked through.
  3. Move chicken to baking dish(es).  Add potatoes and carrots to chicken water.  Boil 30 minutes or until softened.
    Add potatoes and carrots to chicken in baking dish(es).
  4. Move cooking liquid to measuring cup and add enough chicken broth to make 3 cups.
  5. Add soup and broth to the pot.  Stir to combine.  Add the liquid, stir, and bring to a boil.
  6. Combine the corn starch and water.  When the soup/gravy/liquid mixture is smooth, add the cornstarch.  Boil for a short time to thicken.
  7. Pour gravy over chicken and vegetables.  You will have about 4 quarts.
  8. Top with pie crust(s).  Bake at 400° for 30 minutes or until golden brown.

Flaky Pie Crust (Joy of Cooking)

This recipe makes 2 single or one double pie crust.  Halve it or freeze the second if you only need one.  I use a food processor, but you could do it by hand.

Ingredients:
2½ cups all-purpose flour
1 tsp sugar
1 tsp salt
½ cup shortening
1 stick unsalted butter
generous 1/3 cup of cold water

Directions:

  1. Add the flour, sugar, and salt to food processor.  Pulse to combine.
  2. Add the shortening.  Pulse to the consistency of cornmeal.
  3. Add the butter.  Pulse to pea-sized bits.
  4. If your unit has a feed tube, drizzle the water through the feed tube while pulsing to combine.  Do not over mix.  If you have to pour the water in directly, do so in 2-3 batches so you do not over mix.
  5. Press into a flattened circle and wrap in wax paper.  Refrigerate for 4 hours, or up to 2 days.  If you will not be using it that soon, place the wax paper pouch in a plastic bag and freeze.  If you are only using half, split after the refrigeration stage and freeze the remaining portion.

Enter your email address to follow Busy in the Burbs and receive notifications of new posts by email.

About Me

Welcome! I’m Nora. We have 5 boys and 1 girl. I write about the practical stuff that we call life – managing school, sports, and all things suburban. I get everyone where they need to be, with their stuff, when they need to be there and write about how that all gets done.

Recent Posts

  • October 2019 Grocery Review November 25, 2019
  • September 2019 Grocery Review November 18, 2019
  • Grocery Update – Week 36, 2019 September 24, 2019
  • Grocery Update – Week 35, 2019 September 23, 2019
  • August 2019 Grocery Review September 17, 2019

Categories

  • Accomplishments
  • Books
  • Family
  • Groceries
  • Home
  • Menus
  • Product Reviews
  • Recipes
  • Sports
  • Travel
  • Twins
  • Uncategorized
  • Websites

Pages

  • About
  • Contact
  • FTC Disclosure

Blog at WordPress.com.

  • Follow Following
    • Busy in the Burbs
    • Join 60 other followers
    • Already have a WordPress.com account? Log in now.
    • Busy in the Burbs
    • Customize
    • Follow Following
    • Sign up
    • Log in
    • Report this content
    • View site in Reader
    • Manage subscriptions
    • Collapse this bar
 

Loading Comments...
 

You must be logged in to post a comment.