• About
  • Contact
  • FTC Disclosure

Busy in the Burbs

Busy in the Burbs

Category Archives: Recipes

Pan-Fried Pork Dumplings

05 Friday May 2017

Posted by Nora in Recipes

≈ 1 Comment

Tags

dumplings, Pork

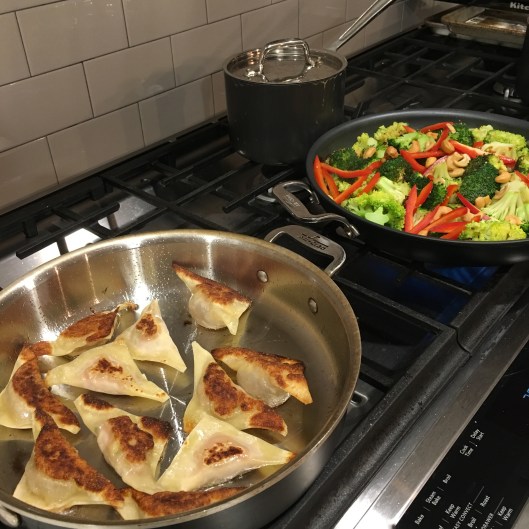
This recipe admittedly takes a long time.  It also uses some less standard ingredients.  But, it makes a lot so freeze some and have an easy dinner another night (or two).  Yes, there is a broccoli stir fry that goes with the dumplings.  I’ll post that recipe next week.

IMG_5833

Pork Dumplings
adapted from Family Fun magazine, February 2010

Ingredients:
1 egg white, lightly beaten
1 Tbsp soy sauce
2 tsp oyster sauce
2 tsp sesame oil
1 tsp cornstarch
½ tsp sugar
¼ tsp kosher salt
1/8 tsp pepper
¼ lb shredded Napa cabbage (about 2 cups)
¼ cup minced scallions
2 tsp minced fresh ginger
1 small garlic clove, minced
½ lb ground pork
24* round dumpling wrappers or wonton skins

Directions:

  1. Whisk together the egg white, soy sauce, oyster sauce, sesame oil, cornstarch, sugar, salt, and pepper in a large bowl.
  2. Stir in the cabbage, scallions, ginger, and garlic.  Add the pork and stir until fully combined.
  3. Line two baking sheets with parchment paper.
  4. Stuff the dumplings.
    1. Fill a small bowl with water.
    2. Lay out 6 wrappers on your work surface.  Cover the remainder with a wet paper towel.
    3. Spoon 2 tsp of filling into the center of each wrapper.
    4. Using water on your finger, moisten the outer rim of each wrapper.
    5. Bring the opposite sides of the wrapper together and pinch together, eliminating as much air as possible.
      1. Avoid having too much filling as it will break the wrapper.
  5. Transfer the dumplings to the baking sheets, spacing them so they don’t touch.  Cover with a damp cloth while you finish the other dumplings.
  6. Refrigerate for up to two hours.  Or, freeze on the baking sheet and then transfer frozen, uncooked dumplings to a freezer bag for up to three months.
  7. Cook the dumplings.
    1. Heat 2 tsp vegetable oil in a large non-stick skillet over medium-high heat.  Arrange about a dozen dumplings in the pan, not touching, and leave for 2 minutes to cook the wrapper.
    2. Add ¼ cup of water, and cover.  Let cook for 5 minutes.
    3. Uncover the pan and raise the heat to cook off the remaining water.
    4. Continue frying the dumplings for 2 additional minutes.
    5. Serve immediately or transfer to a warm oven.
    6. Repeat for remaining dumplings.
    7. If dumplings are frozen, do not thaw.  Follow the same process, but increase the cooking time from 5 to 7 minutes.

*Note:  I have never been able to fit all the filling in 24 wrappers so I purchase extras (roughly double) to use all the filling.

Sweet Potato Chocolate Chip Muffins

21 Friday Apr 2017

Posted by Nora in Recipes

≈ Comments Off on Sweet Potato Chocolate Chip Muffins

Tags

chocolate chip, Muffins, pumpkin, sweet potato

IMG_6095

Sweet Potato Chocolate Chip Muffins
Adapted from The Frugal Girl

Ingredients:
4 eggs
1½ cups sugar
3 sweet potatoes (steamed and mashed)
¾ cup milk
¾ cup vegetable oil
2 cups all-purpose flour
1 cup whole wheat flour
2 tsp baking soda
2 tsp baking powder
1 tsp cinnamon
1 tsp salt
2 cups chocolate chips

Directions:

  1. Preheat oven to 350°.
  2. In a large mixing bowl, beat the first 5 ingredients (through oil) until smooth.
  3. In a separate bowl, combine the dry ingredients (through salt).
  4. Stir the dry into the wet ingredients until just combined.
  5. Add the chocolate chips.
  6. Fill greased or lined muffin tins ¾ full.
  7. Bake 15-20 minutes.

This will make 36 good sized muffins.  Or, you could fill the cups only halfway and make 48 smaller ones.  You can also use one 16-oz can of pureed pumpkin in place of the sweet potatoes.

Do I have to buy the Starbucks Snacks …

24 Friday Mar 2017

Posted by Nora in Product Reviews, Recipes

≈ Comments Off on Do I have to buy the Starbucks Snacks …

Obviously the answer is no.  You never have to buy anything specific, least alone a snack from a drive through.

I am not a coffee drinker, but I do stop by Starbucks from time to time for a hot chocolate because it’s pretty good.  I’ve also never bought food much at Starbucks, until I was pregnant with my youngest.  Then, inevitably, I was hungry in between the preschool drop off and whatever errand I was running that day.  So, I tried a Cheese & Fruit Bistro Box.  For the uninitiated, this includes apple slices; a mix of dried cranberries and almonds; small chunks of brie, cheddar, and gouda; and some multigrain crackers.  While nothing spectacular, this was all pretty good.  But, one day they were out so I tried the Protein Bistro Box which includes an egg, apple slices, grapes, cheddar cheese, muesli, and honeyed peanut butter.  The egg was a nice addition so that became my go to box.  Though, ideally I’d have the egg, three cheese mix, grapes, and apples.  The other items are not fine, but I ate them because they were there not because they were my favorites (excessive calories are not a problem in our hose).

Then, the baby was born and not faced with 24/7 hunger I stopped buying the Bistro Boxes.  Enter the Sous Vide Egg Bites this past January.  Since we own a precision cooker (item required to sous vide things), I wanted to give them a try.  And, they were pretty good.  Add to that that soccer/baseball season is coming up pretty soon so I’ll be spending many entire Saturdays away from the house.  I thought, maybe I can replicate these snacks, only with the ingredients I want.  They would be reasonably healthy and are designed to grab and go.  They include things that, in many cases, are already at home.  And, it would be a lot cheaper to assemble them myself.

So, I purchased some divided Tupperware containers to keep the wetter things from the dryer things or the colder from the warmer (though I’m trying to keep anything extra warm or extra cold).  And, behold, I have everything I need for homemade Bistro Boxes – apples, grapes, cheese, egg, and crackers.  My plan is to assemble on Friday night so I can grab and go on Saturdays.

Then I came to the heart of the issue, the egg bites.  I found some inspiration from Anova (https://anovaculinary.com/easy-homemade-sous-vide-egg-bites/), bought some 4 oz jelly jars, and adapted the recipe to what I had at home.  These came out lighter than Starbucks’ version – more like the creme in creme brulee.  But, they were tasty, easy enough, and batch cooked so I’ll have them for a while.

IMG_6149
IMG_6150
IMG_6151

Sous Vide Eggs
Adapted from Anova

Ingredients:
12 eggs
1 cup heavy cream
1 cup grated gruyere cheese
½ tsp salt
4 Tbsp diced red pepper (this could be about anything, but you’re looking for 4-6 Tbsp total volume)

Directions:

  1. Set your precision cooker to 172°.
  2. In a blender, combine the eggs, heavy cream, cheese, and salt.
  3. Divide among 12 4-oz jelly jars, filling about half full.
  4. Divide the peppers (filling) among the jars.
  5. Use the rest of the egg mix to top up the jars.
  6. Use the two-part lids and close to finger tightness.
  7. Submerge the jars in the water bath for 1 hour.
  8. When done, if you are not eating immediately, move to a cold water bath to bring to room temperature before stashing in the refrigerator.
  9. They can be eaten straight from the jar.  Or, use a butter knife around the edge to loosen from the jar and invert.  When ready to eat, microwave for 30 seconds.  (Or, I’m sure a few moments under a broiler to brown would be great.  I just haven’t tried that yet.)


It’s all About the Chocolate

17 Friday Mar 2017

Posted by Nora in Recipes

≈ Comments Off on It’s all About the Chocolate

Tags

Chocolate, Chocolate Cake, Chocolate Pecan Pie

This week was chocolate desserts week.

For Pi day (3.14), I made a chocolate pecan pie.  The boys were evenly divided between chocolate cream pie and pecan pie so this was the compromise.  I basically merged the Karo pecan pie recipe with the Hershey’s chocolate pie recipe and it came out well.

Chocolate Pecan Pie
inspired by Hershey’s and Karo Syrup

Ingredients:
1 cup Dark Corn Syrup
3 eggs
1 cup sugar
2 Tbsp oil
1 tsp vanilla extract
1 cup pecans
1 unbaked 9-inch pie crust

Directions:

  1. Preheat oven to 350°.
  2. Stir together all ingredients except pecans (and pie crust) thoroughly.
  3. Mix in pecans.
  4. Pour into pie crust.
  5. Bake for 60-70 minutes.  Cool for 2 hours before serving.
IMG_6137
IMG_6134

Wednesday we had a birthday and he, of course, wanted chocolate cake.  This cake was the best non-box-mix chocolate cake I’ve made.  I think pairing it with the chocolate icing (Hershey’s “Perfectly Chocolate” Chocolate Frosting) was a bit much.  I also think I have better icing recipes so I’m not going to duplicate it here.  I also halved this recipe to make a single round.

Hershey’s “Perfectly Chocolate” Chocolate Cake
from the Hershey’s Cocoa packaging

Ingredients:
2 cups sugar
1 ¾ cups all-purpose flour
¾ cup Hershey’s Cocoa
1½ tsp baking powder
1½ tsp baking soda
1 tsp salt
2 eggs
1 cup milk
½ cup vegetable oil
2 tsp vanilla extract
1 cup boiling water

Directions:

  1. Preheat oven to 350°.
  2. Grease & flour two 9-inch round baking pans.
  3. Combine the dry ingredients in a large bowl.
  4. Add eggs, milk, oil, and vanilla.  Beat on medium for 2 minutes.
  5. Stir in the boiling water.  (Batter will be thin.)
  6. Pour into pans.
  7. Bake 30-35 minutes.
  8. Cool 10 minutes before removing to wire racks to cool.
  9. Frost once completely cooled.

New Recipe – Fish Tacos with Guacamole & Pico de Gallo

03 Friday Mar 2017

Posted by Nora in Recipes

≈ Comments Off on New Recipe – Fish Tacos with Guacamole & Pico de Gallo

Tags

Fish, Fish Tacos

First, apologies for missing yesterday’s post.  We had a high wind warning and the wind did take out the power for a couple of hours.

After many months of listening to requests for fish tacos, I finally found a recipe I wanted to try – The Frugal Girl’s Not-Fried Fish Tacos.  I made the recipe as described and it was a real winner.  I even cut the fish fillets in half per her recommendation which made each piece the perfect size for one taco.  When I repeat it, I’ll probably skip microwaving the spices (not sure that actually did anything) and I’ll significantly increase the chipotle peppers in the sauce.  Some people thought the sauce needed more kick and we determined that the only people interested in the sauce were folks who would be ok with extra spice.

img_6084
img_6085
img_6086
img_6087
img_6088

She recommended serving with guacamole and pico de gallo, among other toppings, so I made those too.  These were both recipes I’d made before and ones that seem to need some doctoring.

The guacamole recipe is from food.com.  It is very good.  I just find the full recipe is well over the stated six servings.  So, I basically halved it.  But, I rounded up the avocado and kept with two limes.  Pressing plastic wrap onto the surface goes along way towards keeping the brown at bay.

The pico de gallo recipe from Food Network needs even more doctoring.  Mainly, it produces WAY more than 4-6 servings.  I HIGHLY recommending thirding the recipe unless you are serving a LARGE crowd.  I also think it does well with a rest to let the flavors meld.  So, I try to make it in the morning if we’re planning to have it for dinner that night.

As you can see we also had flour tortillas, corn chips, cheese, sour cream, diced jalapeno, and lime slices.  Nobody uses all of those things, but different people enjoy different combinations.

Sausage Stuffing

24 Friday Feb 2017

Posted by Nora in Recipes

≈ Comments Off on Sausage Stuffing

Tags

Sausage Stuffing, Stuffing

Part of what I most appreciate about this recipe is that it freezes well.  We can’t use the entire recipe at once, but I can put some in a foil pan and then cook it directly from frozen.  We enjoy this with ham as well as turkey.

img_5851

Sausage and Chestnut Dressing
adapted from the Williams-Sonoma Thanksgiving booklet, 2006

Ingredients:
1 box (16 oz) stuffing
4 Tbsp butter
2 yellow onions, diced
4 celery stalks, diced
½ cup white wine
2 cups prepared chestnuts, roughly chopped
salt and pepper
1¼ lb mild Italian sausage, casings removed
6 Tbsp chopped flat-leaf parsley
3-3½ cups chicken broth

Directions:

  1. Preheat oven to 375°.  Butter a 3½-4 quart casserole dish.  (Butter multiple dishes if you’re dividing.  The above picture shows three roughly 8-inch square containers.
  2. Put the stuffing in a large bowl and set aside.  (I cannot emphasize LARGE enough.  You’ll regret it later if you skimp on the bowl.)
  3. Melt the butter in a medium saute pan over medium-high heat.  Add the onions and celery.  Saute 3-5 minutes until soft and translucent.
  4. Add the wine, stirring to scrape up the browned bits, for 3 minutes or until most of the liquid has evaporated.
  5. Add the chestnuts and cook for a further 2 minutes.
  6. Season with salt and pepper.
  7. Transfer this mixture to the bowl with the stuffing.  Mix.
  8. Using the same pan, cook the sausage until lightly browned and cooked through, about 10 minutes.  Transfer to the bowl with the stuffing.
  9. Add the parsley to the bowl and stir to combine.
  10. Stir in 3 cups of broth.  Add more broth if needed and season with salt and pepper.
  11. Transfer to the baking dish(es), cover with buttered aluminum foil, and bake for 20 minutes.  (If starting from frozen, the initial bake time is closer to 40 minutes.)  Remove the foil and continue baking until the top is golden and crispy, another 15-20 minutes.

Brown Butter Brussels Sprouts

10 Friday Feb 2017

Posted by Nora in Recipes

≈ Comments Off on Brown Butter Brussels Sprouts

Tags

Brussels Sprouts

img_5771

We often have this with lemon chicken and pan fried potatoes.  I plan to post the potato recipe next week.  I tend to use whole Brussels sprouts, but I imagine shaved ones would be excellent also, just a different consistency.  You might not even have to steam those.

Brown Butter Brussels Sprouts
Adapted from Aaron McCargo Jr.’s recipe on Food Network.

Ingredients:
1 ½ lbs Brussels sprouts, trimmed and halved or quartered into bite size pieces
3 Tbsp butter
1 Tbsp caraway seeds
Juice from 1 lemon
Salt & pepper

Directions:

  1. Steam the Brussels sprouts to your desired eating consistency.  They can be done in advance and brought back to room temperature.  I do not recommend refrigerating them after steaming.
  2. In a saute pan, melt the butter.
  3. Add the Brussels sprouts and saute until browned and warmed.
  4. Add caraway seeds and lemon juice.  Salt and pepper.  Stir and serve.

A Review of Eataly’s Paccheri al Forno Recipe

03 Friday Feb 2017

Posted by Nora in Product Reviews, Recipes

≈ Comments Off on A Review of Eataly’s Paccheri al Forno Recipe

First, this is not a review of a dish from their restaurant, but a review of the recipe for the dish from their website.

I’ve mentioned before that I received a box of Eataly foods for Christmas.  Two items in the bag were paccheri (large cylindrical pasta) and canned cherry tomatoes.  I wasn’t sure exactly what to do with those so I started poking around online and found many recipes that put the two items together, but only Eataly’s used 1 can of tomatoes.

In retrospect this should have been a sign.  Compare their picture of the dish to mine.

img_5953
img_5942

There is a lot more sauce.  Also, the cheese is still inside the pasta vs melted into a puddle on the bottom.  The flavors of the dish were fine – like lasagna.  Overall, though, it was unnecessarily complicated.  And, it came out nothing like the picture.

I found there were some other oddities as well.  For example, the steps (paraphrased) were in this order:

  1. Make tomato sauce.  Remove from the heat and cover to keep warm.
  2. Make the cheese filling.
  3. Boil the pasta.  Drain and cool.
  4. Stuff pasta with filling.  Top with sauce.  Bake.

Basically the entire recipe is written as if done at different stations at a restaurant.  The parts of the dish would be done filling, pasta, sauce by a single home cook to keep things at the right temperature.  Also, with the ingredient quantities listed, there is far too much pasta for the amounts of filling and sauce.  You would need three times the sauce (3 cans of tomatoes per pound of pasta was the typical amount I found in other recipes) and double the cheese filling.

img_5934
img_5933
img_5935

All in all I found this disappointing as Mario Batali has plenty of cookbooks.  I’ve never tried cooking from one so I don’t know if they present similar problems.  But, I did try the Risotto with Tomato & Basil from Eataly and its instructions were similarly odd/insufficient.  This is definitely an area they need to work on.

Lemon Chicken

06 Friday Jan 2017

Posted by Nora in Recipes

≈ 1 Comment

Tags

Chicken

I got ahead of myself and posted a recipe yesterday.  Here we go with the Friday posts.

This is a simplified version of Martha Stewart’s Roast Spatchcocked Lemon Chicken.  I include the link because it is the more “complete” recipe.  It also includes instructions on how to spatchcock a chicken.

All that being said, our family prefers chicken thighs so I make this with just thighs, and usually leave out the shallots because I don’t always have them around.

img_5771

Lemon Chicken
inspired by Martha Stewart

Ingredients:
Bone-in, skin-on chicken thighs (enough for your family, though leftovers make great white chili or chicken salad)
Lemons, sliced (enough for one slice per thigh)
Salt & pepper

Directions:

  1. Preheat oven to 425°.
  2. Cover a baking sheet with aluminum foil.
  3. Slide one slide of lemon under the skin of each thigh.  (If you have a child that doesn’t like lemons you can leave theirs alone.)
  4. Salt and pepper the chicken.
  5. Roast for 45-50 minutes or until your thermometer reads 165°.

Banana Cake

05 Thursday Jan 2017

Posted by Nora in Recipes

≈ 1 Comment

Tags

Banana Cake, Cake

I’m planning to change things up just a bit for 2017.  Recipes and travel thoughts seem to be the most popular topics.  So, Fridays will be recipe day.  Frankly, I have lots of recipes I could share, my biggest barrier has been remembering to take pictures to go with the text.  I’m going to work on that.  That means Thursdays will absorb some of the topics that were discussed on Fridays, including travel.  We don’t travel enough to dedicate a day every week to that topic.

I’m also going to try to expand on one of the past weeks accomplishments to make it the center of the Tuesday posts.  I’ll identify it in the heading.  (Hopefully soon I’ll be going back to edit the headings of some of the past posts because I’ve learned that having many posts with the same title is a problem.)  Mondays are going to stay the same for now, though I’m debating how to handle the menu aspect since significant chunks of the year aren’t particularly well planned because of all the activities going on.  I may try a few things and see how it goes.

Anyway, here’s your first Friday recipe of 2017.

img_5435

Banana Cake
recipe courtesy of The All New All Purpose Joy of Cooking

Ingredients:
2 large ripe bananas
2 Tbsp sour cream
2 large eggs
1½ tsp vanilla
2 cups flour
¾ cup + 2 Tbsp sugar
1 tsp baking soda
¾ tsp baking powder
½ tsp salt
10 Tbsp butter, softened
1 cup chocolate chips (or the remainder of the bag after making Ganache)

Directions:

  1. Preheat the oven to 350°.
  2. Line the bottom of a non-stick springform pan with parchment paper.
  3. Combine the bananas and sour cream in a food processor.
  4. Add the eggs and vanilla.  Process until smooth.
  5. In a large bowl, mix together the dry ingredients (flour through salt).
  6. Add half the banana mixture plus the softened butter.
  7. Beat until just moistened.  Then increase the speed and beat for another 1½ minutes.
  8. Add the remaining banana mixture in two portions, mixing thoroughly after each.
  9. Stir in the chocolate chips.
  10. Spread evenly in the pan.
  11. Bake until a toothpick comes out clean, 30-40 minutes.
  12. Cool in the pan for 10 minutes before removing.
  13. Cool completely before dusting with powdered sugar or frosting with Chocolate Ganache Glaze.

Chocolate Ganache Glaze

Ingredients:
¾ cup heavy cream
1 1/3 cups chocolate chips

Directions:

  1. Bring the cream to a boil.
  2. Remove from heat and add the chocolate chips.  Stir to melt.
  3. Cover and let stand for 10 minutes.  Stir until smooth.
  4. For pourable glaze, cool to room temperature.  For frosting, let stand until spreadable.
← Older posts
Newer posts →

Enter your email address to follow Busy in the Burbs and receive notifications of new posts by email.

About Me

Welcome! I’m Nora. We have 5 boys and 1 girl. I write about the practical stuff that we call life – managing school, sports, and all things suburban. I get everyone where they need to be, with their stuff, when they need to be there and write about how that all gets done.

Recent Posts

  • October 2019 Grocery Review November 25, 2019
  • September 2019 Grocery Review November 18, 2019
  • Grocery Update – Week 36, 2019 September 24, 2019
  • Grocery Update – Week 35, 2019 September 23, 2019
  • August 2019 Grocery Review September 17, 2019

Categories

  • Accomplishments
  • Books
  • Family
  • Groceries
  • Home
  • Menus
  • Product Reviews
  • Recipes
  • Sports
  • Travel
  • Twins
  • Uncategorized
  • Websites

Pages

  • About
  • Contact
  • FTC Disclosure

Blog at WordPress.com.

  • Subscribe Subscribed
    • Busy in the Burbs
    • Join 60 other subscribers
    • Already have a WordPress.com account? Log in now.
    • Busy in the Burbs
    • Subscribe Subscribed
    • Sign up
    • Log in
    • Report this content
    • View site in Reader
    • Manage subscriptions
    • Collapse this bar
 

Loading Comments...
 

You must be logged in to post a comment.