• About
  • Contact
  • FTC Disclosure

Busy in the Burbs

Busy in the Burbs

Category Archives: Recipes

White Chili

09 Friday Dec 2016

Posted by Nora in Recipes

≈ Comments Off on White Chili

Tags

White Chili

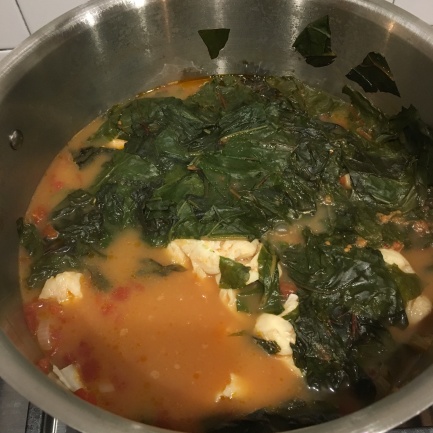
Here’s one way to use up your leftover turkey.  It’s especially nice that it has a different flavor profile from standard Thanksgiving fare, but will work even with a Thanksgiving-flavored bird.  I achieve the fresh cilantro by freezing it in chicken broth when I have extra.  One ice cube is basically 2 Tbsp.

We serve Tabasco, chives, diced tomato, cheddar cheese, and sour cream on the side.  We often have cornbread.

img_5695
img_5696
img_5697

White Chili
Recipe courtesy of The Big Red Cookbook from Betty Crocker

Ingredients:
1 Tbsp vegetable oil
1 medium onion, chopped
2 cloves of garlic, chopped
3 cups of chicken broth
2 Tbsp fresh cilantro
2 Tbsp lime juice
1 tsp ground cumin
½ tsp dried oregano
¼ tsp red pepper sauce
¼ tsp salt
1 can (11 ounces) of corn
2 cups chopped cooked chicken or turkey

Directions:

  1. Heat oil in 4-Quart Dutch oven over medium heat.
  2. Cook onions and garlic until tender.
  3. Add all remaining ingredients except chicken/turkey.  Heat to boiling.  Reduce heat and simmer uncovered for 20 minutes.
  4. Add chicken/turkey and simmer until hot.

Asiago Chicken

28 Friday Oct 2016

Posted by Nora in Recipes

≈ Comments Off on Asiago Chicken

Tags

Chicken

As you may have noticed from my menu plans, this is one of our go-to recipes.  The ingredients are easy to keep on hand, everyone will eat it, its quick, and its foolproof.

img_5486

Orzo with Chicken & Asiago

Ingredients:
1 cup water
1 (16-ounce) can chicken broth
12 ounces boneless, skinless chicken thighs cut into bit sized pieces
1¼ cups uncooked orzo
1 cup peas
½ cup grated Asiago cheese, divided
¼ tsp salt
¼ tsp basil
¼ tsp Italian seasoning
¼ tsp pepper

Directions:

  1. Combine water and broth in a dutch oven; bring to a boil.
  2. Add chicken and pasta; bring to a boil.  Reduce heat, simmer 12 minutes, stirring occasionally.
  3. Remove from heat; stir in peas, 1/4 cup cheese, salt, herbs, and pepper.
  4. Top each serving with 1 Tbsp cheese.
Makes 4 servings
Prep: 5 min
Cook: 25 min
Notes:
Fresh peas are best, but frozen work fine.  Since peas are so small, there’s really no need to thaw them first, just throw them in towards the end of the simmer step before the cheese.
Re step 2, cook until sauce is desired thickness.  If you need to slow down dinner it can simmer longer – just add a bit more chicken broth.
I’ve also made this with green beans though I think peas are better.  I imagine broccoli would work well too.
You can adjust the quantity of chicken to your needs.
Makes a great side if you skip the chicken.
To make a vegi version (or if you’re all out), use vegi broth instead of chicken.

Basic Chicken Pot Pie

07 Friday Oct 2016

Posted by Nora in Recipes

≈ Comments Off on Basic Chicken Pot Pie

Tags

Chicken, Chicken Pot Pie

Yes, there are plenty of recipes already on the internet.  And, yes, there are fancier versions.  But, this one is relatively quick and easy, the kids will eat it, and it reheats well.

You can adjust the chicken/potato/carrot ratio.  Parsnips or turnip are also nice additions.  I prefer to make two shallow pies, but you could make one deep one depending on your family’s feelings about crust.

img_5394

Ingredients:
6 lbs boneless, skinless chicken thighs
2 potatoes
6 carrots
chicken broth – up to 3 cups
1/4 c (1 pkg) brown gravy mix
1 can cream of chicken soup
2 Tbsp corn starch
1/4 c water
1-2 pie crusts (recipe below)

Directions:

  1. Cut chicken, potatoes, and carrots into bite size pieces.
  2. Add chicken to a large pot.  Cover with water and boil 20 minutes until cooked through.
  3. Move chicken to baking dish(es).  Add potatoes and carrots to chicken water.  Boil 30 minutes or until softened.
    Add potatoes and carrots to chicken in baking dish(es).
  4. Move cooking liquid to measuring cup and add enough chicken broth to make 3 cups.
  5. Add soup and broth to the pot.  Stir to combine.  Add the liquid, stir, and bring to a boil.
  6. Combine the corn starch and water.  When the soup/gravy/liquid mixture is smooth, add the cornstarch.  Boil for a short time to thicken.
  7. Pour gravy over chicken and vegetables.  You will have about 4 quarts.
  8. Top with pie crust(s).  Bake at 400° for 30 minutes or until golden brown.

Flaky Pie Crust (Joy of Cooking)

This recipe makes 2 single or one double pie crust.  Halve it or freeze the second if you only need one.  I use a food processor, but you could do it by hand.

Ingredients:
2½ cups all-purpose flour
1 tsp sugar
1 tsp salt
½ cup shortening
1 stick unsalted butter
generous 1/3 cup of cold water

Directions:

  1. Add the flour, sugar, and salt to food processor.  Pulse to combine.
  2. Add the shortening.  Pulse to the consistency of cornmeal.
  3. Add the butter.  Pulse to pea-sized bits.
  4. If your unit has a feed tube, drizzle the water through the feed tube while pulsing to combine.  Do not over mix.  If you have to pour the water in directly, do so in 2-3 batches so you do not over mix.
  5. Press into a flattened circle and wrap in wax paper.  Refrigerate for 4 hours, or up to 2 days.  If you will not be using it that soon, place the wax paper pouch in a plastic bag and freeze.  If you are only using half, split after the refrigeration stage and freeze the remaining portion.

Egg Bread

10 Friday Jun 2016

Posted by Nora in Recipes

≈ Comments Off on Egg Bread

Tags

Bread, Egg Bread

This is from the Better Homes & Gardens New Cookbook.

IMG_4429

Egg Bread

4¾-5¼ cups all purpose flour
1 package active dry yeast
1 1/3 cups milk
3 Tbsp sugar
3 Tbsp margarine or butter
½ tsp salt
2 eggs

  1. Combine 2 cups of flour and the yeast.
  2. In a saucepan, heat the milk, sugar, margarine, and salt until warm.
  3. Add to the flour mixture along with the eggs.
  4. Beat on low for 30 seconds, then on high for 3 minutes.
  5. Stir in as much remaining flour as possible.
  6. Kneed for 6-8 minutes.
  7. Shape into a ball and place in a lightly greased bowl, turning once to grease all sides.
  8. Cover and let rise in a warm place until double (about 60 minutes).
  9. Punch down and turn onto a lightly floured surface.
  10. Divide into six pieces.  Cover and let rest 10 minutes.
  11. Lightly grease two 8x4x2 loaf pans.
  12. Roll all six pieces into long snakes.  In two groups of three braid the loaves.  Turn the ends under and place in the loaf pans.
  13. Cover and let rise until almost double (about 30 minutes).
  14. Preheat the oven to 375° so it is ready when the rise is done.  Bake for 25-30 minutes.  Remove from pans; cool.

Cheesy Cauliflower

27 Friday May 2016

Posted by Nora in Recipes

≈ Comments Off on Cheesy Cauliflower

Tags

Cauliflower

This recipe is a variation of Alton Brown’s Cauliflower Say Cheese recipe.  The flavors are the same, but the cooking times and general process are rather different.  Note this can be adjusted to fit your needs/taste, from the amount of cauliflower or sauce to the level of heat.

IMG_4430
IMG_4431

1 head of cauliflower
4½ ounces grated Cheddar cheese
½ cup Panko bread crumbs
1 egg
1 tsp kosher salt
1 tsp dry mustard
½ tsp smoked paprika
¼ tsp black pepper
¼ tsp cayenne pepper (personally I don’t prefer heat so I go a little light here)
½ cup heavy cream

  1. Preheat the oven to 400°.
  2. Trim the curds from the cauliflower, leaving them in 1 or 2 bite sized pieces.  Place in a glass bowl.  Cover tightly with plastic wrap and microwave on high until it is just starting to soften (4-10 minutes depending on your microwave).  Rest, still covered in plastic, for another 4-10 minutes.  At this point you should be happy with the consistency as it will barely soften any further.
  3. Combine all the other ingredients except the cream.
  4. When one minute remains on the cauliflower rest period, microwave the cream on high for 30 sec – 1 minute (Again, it depends on your microwave.  You want it just hot enough to melt the cheese.)
  5. Add the cream to the cheese mixture and stir to combine.
  6. Carefully remove the plastic from the cauliflower.  Spread the cauliflower in a shallow glass baking dish.
  7. Spread the cheese mixture over the cauliflower.  This can be tricky, but try not to leave giant chunks of cheese mix.  You can also leave some cauliflower plain if some members of your family would prefer.
  8. Bake for 20 minutes.
  9. If desired, sprinkle some extra cheese over the top and broil for an additional 6-8 minutes.
  10. Rest 10 minutes before serving.

We quite like this with ham, raisin sauce, and egg bread.

Broiled Fish in a Greek Marinade

12 Thursday Nov 2015

Posted by Nora in Recipes

≈ Comments Off on Broiled Fish in a Greek Marinade

Tags

Fish

I don’t buy swordfish very often, but I was looking for some variety from my usual cod and salmon.  At the fish counter, the swordfish seemed like the best option.  And, this recipe was a huge hit so it will definitely be made again.

Recipe courtesy of Williams-Sonoma Kitchen Library Fish cookbook, though I did modify it somewhat.

IMG_3982

5 Tbsp olive oil
1 1/2 Tbsp minced garlic
1 Tbsp dried oregano
1 tsp dried thyme
zest of 1 lemon
1/4 cup lemon juice
salt & pepper
4 swordfish steaks
lemon wedges for serving

  1. Mix all the ingredients except fish & lemon wedges in a shallow non-reactive container.
  2. Add the fish and turn to coat.
  3. Cover and marinate 2-3 hours in the refrigerator.
  4. Preheat broiler (or grill).
  5. Place fish on broiler pan or grill rack.
  6. Broil/grill about 4 minutes per side.

Note: I forgot to take a picture of the actual dish, but since its the cover photo for the book, I included a picture of the book here to give you an idea of what the final dish looks like.

Cod with Swiss Chard & Potatoes

11 Friday Sep 2015

Posted by Nora in Recipes

≈ Comments Off on Cod with Swiss Chard & Potatoes

Tags

Fish

This is from The Boston Globe Magazine – February 17, 2008.

img_5685

This is one of my go-to farmer’s market recipes.  You can easily adjust the amount of fish to your needs without affecting the other ingredients.  I make ours in an 8-qt stock pot because I like the extra depth.  I find a saute pan to be a bit tight.  Serve with a crusty bread.

2 1/2-lb skinless cod fillets
1/4 lemon
2 Tbsp olive oil
1 large onion, cut in half & thinly sliced
1 fennel bulb, cored and thinly sliced (optional)
1 can (28 oz) diced tomatoes, draining optional
3 medium Yukon Gold potatoes, thinly sliced (I have used red also.)
3 cups chicken broth
6 cups (1 bunch) coarsely chopped Swiss chard
2 Tbsp unsalted butter
2 cups chopped fresh basil (optional)

  1. Rinse the cod, pat dry, and sprinkle with salt & pepper.  Squeeze the lemon over the fillets and set the fish aside.
  2. In pan, heat the olive oil.  Add the onion & fennel, season with salt & pepper, and cook until vegetables are soft, about 5 minutes.
  3. Mix in the tomatoes and simmer for about 5 minutes.
  4. Arrange the potato slices on top of the tomato mixture.  Season with more salt & pepper, add the chicken broth, cover, and simmer until the potatoes are tender, about 10 minutes.  (Note: this often takes more like 20 minutes, especially if using red potatoes.)
  5. Lay the cod fillets on top of the potatoes and put the Swiss chard on top of the fish.  Cover again and cook until the chard is wilted and the fish is cooked through, about 10 minutes.
  6. Divide the chard among 6 plates.  Divide the fish into portions and place on top of the chard, then divide and arrange the potatoes around the fish.
  7. Optional: Put the pan back on the heat, add the butter to the sauce, and stir to mix.  Reduce for about 2 minutes, then adjust season with salt & pepper.  Add basil to the sauce, stir to mix, and spoon over the fish.  Serve immediately.

Blueberry Muffins

30 Thursday Jul 2015

Posted by Nora in Recipes

≈ Comments Off on Blueberry Muffins

Tags

Blueberry, Muffins

If you’re anything like us you are enjoying the in season blueberries, but every now and then a batch goes uneaten, or you pick your own and end up with way more than you can eat.  I really like this recipe because it works equally well with fresh or frozen blueberries.  The muffins are best the first day, but still tasty after that.

IMG_3503

Blueberry Muffins*
2 cups AP flour
2/3 cup sugar
2 1/2 tsp baking powder
1/4 tsp baking soda
1/2 tsp salt
1 tsp cinnamon
1 cup milk
1/2 cup vegetable oil
2 eggs
1 cup blueberries (do not thaw if frozen)

1. Preheat an oven to 400F.  Butter standard muffin tins.
2. In a medium bowl stir together the dry ingredients.  In a separate bowl whisk together the milk, oil, and eggs until smooth.
3.  Add the combined dry ingredients to the wet and stir just until just blended.  Add the blueberries and stir just until evenly incorporated.
4.  Fill each muffin cup about three-quarters full.
5.  Bake until a toothpick inserted in the center of a muffin comes out clean, 15-20 minutes.  Cool in tins for 5 minutes, then remove to a rack to cool.

Makes about 16 standard muffins.

*Recipe courtesy Williams-Sonoma Kitchen Library Muffins & Quick Breads.

I Need a New Pizza Dough Recipe

24 Friday Apr 2015

Posted by Nora in Recipes

≈ Comments Off on I Need a New Pizza Dough Recipe

I’m not sure what’s gone wrong with my favorite store bought pizza dough, but it’s been very wet and sticky for months now.  Before the kids were born, I made our pizza dough and I’ve been talking about getting back to that.  This is pushing me over the edge.

A while back I tried The Frugal Girl’s pizza dough recipe.  I like her potato bread recipe so I thought this one might work out.  But, it tasted too much like saltine crackers and I wasn’t overly fond of the texture either.  I got so annoyed last week that I bought the Wegman’s pizza dough.  It was worse.  The texture was fine, but the taste was all off.

The pizza dough I used to make was from the old William’s Sonoma Bread cookbook.  It was fine, but nothing spectacular.  I can do better.

I’ve found six recipes on the internet that come recommended (in the order I intend to try them):

  • Peter Reinhart’s Napoletana Pizza Dough
  • Refrigerator Bread
  • Peter Reinhart’s Neo-Neopolitan Pizza Dough
  • King Arthur Flour’s The Easiest Pizza You’ll Ever Make
  • Roberta’s Pizza Dough
  • Hacker-Free Neapolitan Pizza for a Home Kitchen

This seemed like a good month to get started on trying these since we’ll be eating a lot of quick, late dinners – i.e., pizza.  I’m going to aim for one every 1-2 weeks and I’ll let you know how they go.  Of course if I come to one that is just to die for, I may not get to the rest!

Braised Pork

06 Friday Feb 2015

Posted by Nora in Recipes

≈ Comments Off on Braised Pork

Tags

Pork

Well, one positive thing did come out of all this snow.

When all this first happened they were forecasting widespread power outages.  That didn’t happen and our smoker got entirely buried.  So, the pork butt I bought had gone unused.

But, the second storm came along and it was time to shop the pantry.  Searching online for something to do with it I found Melissa d’Arabian’s Succulent Braised Pork.  I had all the ingredients (except the parsley stems so we just skipped those).  I also doubled the recipe.  It was excellent – flavor and texture – and so easy to make.  We served it over a bed of mashed potatoes.

Succulent Braised Pork
Recipe courtesy of Melissa d’Arabian and Food Network

Ingredients:
2 pounds of pork shoulder, cut into 6 large chunks
Salt and freshly ground black pepper
2 Tbsp olive oil
1 onion, chopped
2 celery stalks, chopped
1 carrot, chopped
1 clove garlic, roughly chopped
2 Tbsp tomato paste
2 Tbsp all-purpose flour
1 cup red wine
1 ½ cups beef stock or broth
1 bunch parsley stems, tied with string
2 bay leaves
1 cup water

Directions

  1. Preheat the oven to 325 degrees F. Pat the pork dry with paper towels and season with salt and pepper.
  2. In a large Dutch oven, heat the olive oil over medium-high heat. Working in batches brown the meat on all sides until a golden crust forms.  Transfer the pork to a plate.
  3. To the pan add the onion, celery, and carrot and sweat until softened, 5 to 7 minutes.
  4. Add the garlic and sweat another 2 minutes.
  5. Stir in the tomato paste and cook for 3 minutes to cook off the raw flavor and caramelize it.
  6. Sprinkle with the flour and cook another 2 minutes to cook off its raw flavor.
  7. Wisk in the wine and reduce it by half.
  8. Return the pork to the Dutch oven, then stir in the beef stock/broth, parsley stems, and bay leaves. Add the water if liquid does not come up to the top of the pork.  Do not cover the pork with liquid.
  9. Cover the pan and place it in the oven to braise until the meet is fork tender, about 3 hours. Taste and season with more salt and pepper, if needed.  Transfer to a serving platter and serve.
← Older posts
Newer posts →

Enter your email address to follow Busy in the Burbs and receive notifications of new posts by email.

About Me

Welcome! I’m Nora. We have 5 boys and 1 girl. I write about the practical stuff that we call life – managing school, sports, and all things suburban. I get everyone where they need to be, with their stuff, when they need to be there and write about how that all gets done.

Recent Posts

  • October 2019 Grocery Review November 25, 2019
  • September 2019 Grocery Review November 18, 2019
  • Grocery Update – Week 36, 2019 September 24, 2019
  • Grocery Update – Week 35, 2019 September 23, 2019
  • August 2019 Grocery Review September 17, 2019

Categories

  • Accomplishments
  • Books
  • Family
  • Groceries
  • Home
  • Menus
  • Product Reviews
  • Recipes
  • Sports
  • Travel
  • Twins
  • Uncategorized
  • Websites

Pages

  • About
  • Contact
  • FTC Disclosure

Blog at WordPress.com.

  • Subscribe Subscribed
    • Busy in the Burbs
    • Join 60 other subscribers
    • Already have a WordPress.com account? Log in now.
    • Busy in the Burbs
    • Subscribe Subscribed
    • Sign up
    • Log in
    • Report this content
    • View site in Reader
    • Manage subscriptions
    • Collapse this bar
 

Loading Comments...
 

You must be logged in to post a comment.